Skip to content →

Category: Tech Blog

Here you can find my random notes on software design and development, software engineering, coding, and all other tech-related stuff.

Raspberry Pi as a toy web server

1. Tell my router to route certain traffic to the Raspberry Pi. For example, I route HTTP and SSH traffic to one of my Pi’s. I disabled password login for  SSH, using public key authentication instead: in /etc/ssh/sshd_config, use the following setting and restart SSH service using `sudo service ssh restart’.

RSAAuthentication yes
PubkeyAuthentication yes

# To disable password authentication:
ChallengeResponseAuthentication no
PasswordAuthentication no
UsePAM no

# To disable root login:
PermitRootLogin no

2. Getting my IP address of the Raspberry Pi. I firstly created a PHP script on my domain to record the IP address in a text file.

<?php                                                                            
                                                                                 
$token = 'secret';                   
                                                                                 
if ($_GET['token'] == $token) {                                                  
    if (!empty($_SERVER['HTTP_CLIENT_IP'])) {                                    
        $ip = $_SERVER['HTTP_CLIENT_IP'];                                        
    } elseif (!empty($_SERVER['HTTP_X_FORWARDED_FOR'])) {                        
        $ip = $_SERVER['HTTP_X_FORWARDED_FOR'];                                  
    } else {                                                                     
        $ip = $_SERVER['REMOTE_ADDR'];                                           
    }                                                                            
    $fp = fopen('home_ip.txt', 'w');                                             
    fwrite($fp, $ip);                                                            
}                                                                                
                                                                                 
?>

Then tell the Raspberry Pi to report its IP address every 5 minutes, using crontab:

pi@alice ~ $ crontab -l
*/5 * * * * curl daoyuan.li/home_ip.php?token=secret

After a while the IP address is recorded in the text file and updated every 5 minutes.

3. Optionally create a DNS record for the Pi. I use Cloudflare to manage DNS settings by myself, so just add/update an entry in Cloudflare’s settings. I point pi.daoyuan.li to the IP address of one Pi. This can be done automatically in the future.

4. Install Flask on the Pi.

sudo apt-get update
sudo apt-get install python-pip
sudo pip install Flask

5. Install nginx and uwsgi on the Pi.

sudo apt-get install nginx
sudo apt-get install build-essential python python-dev
sudo apt-get install python-virtualenv
sudo pip install uwsgi

6. Set up nginx along with uwsgi and Flask.

mkdir flask && cd $_
virtualenv env
. env/bin/activate
pip install Flask

Edit nginx config:

~/flask $ cat flask_nginx.conf 
server {
    listen      5000;
    server_name localhost;
    charset     utf-8;
    client_max_body_size 75M;

    location / { try_files $uri @flask; }
    location @flask{
        include uwsgi_params;
        uwsgi_pass unix:/home/pi/flask/uwsgi.sock;
    }
}
sudo rm /etc/nginx/sites-enabled/default
sudo ln -s flask_nginx.conf /etc/nginx/sites-enabled/default 
sudo service nginx restart

Edit uwsgi config:

~/flask $ cat flask_uwsgi.ini 
[uwsgi]
#application's base folder
base = /home/pi/flask

#python module to import
app = hello
module = %(app)

home = %(base)/env
pythonpath = %(base)

#socket file's location
socket = /home/pi/flask/uwsgi.sock

#permissions for the socket file
chmod-socket    = 666

#the variable that holds a flask application inside the module imported at line #6
callable = app

#location of log files
logto = /home/pi/flask/uwsgi.log

Create a simple Flask app:

~/flask $ cat hello.py
from flask import Flask
app = Flask(__name__)

@app.route("/")
def hello():
    return "Hello World!"

if __name__ == "__main__":
    app.run()

Start up uwsgi:

uwsgi --ini flask_uwsgi.ini &

7. Done! http://pi.daoyuan.li:5000/

 Update on June 24, 2014:

Getting the external address in step 2 can be done by running this command in Raspberry Pi:

curl ifconfig.me

See: http://www.commandlinefu.com/commands/view/5427/get-your-external-ip-address

Leave a Comment
NumPy’s ndarray indexing

In NumPy a new kind of array is provided: n-dimensional array or ndarray. It’s usually fixed-sized and accepts items of the same type and size. For example, to define a 2×3 matrix:

import numpy as np
a = np.array([[1,2,3,], [4,5,6]], np.int32)

When indexing ndarray, it supports “array indexing” other than single element indexing.  (See http://docs.scipy.org/doc/numpy/user/basics.indexing.html)

It is possible to index arrays with other arrays for the purposes of selecting lists of values out of arrays into new arrays. There are two different ways of accomplishing this. One uses one or more arrays of index values. The other involves giving a boolean array of the proper shape to indicate the values to be selected. Index arrays are a very powerful tool that allow one to avoid looping over individual elements in arrays and thus greatly improve performance.

So you basically can do the following:

a = np.array([1, 2, 3], np.int32)
a[np.array([0, 2])) # Fetch the first the third elements, returns np.array([1, 3])
a[np.array([True, False, True])] # Same as the line above

Besides, when you do equals operation on ndarrays, another ndarray is returned by comparing each element:

a = np.array([1, 2, 3], np.int32)
a == 2 # Returns array([False,  True, False], dtype=bool)
a != 2 # Returns array([ True, False,  True], dtype=bool)
a[a != 2] # Returns a sub array that excludes elements with a value 2, in this case array([1, 3], dtype=int32)
Leave a Comment

Statistics of insurance sold on Taobao.com on Valentine’s Day

On Feb. 14th Taobao launched a campaign to sell insurance products, which promises 7% yearly interest rate. The sales data is public, so I wrote a script to crawl them down and did a brief study on this data. Here’re the results.

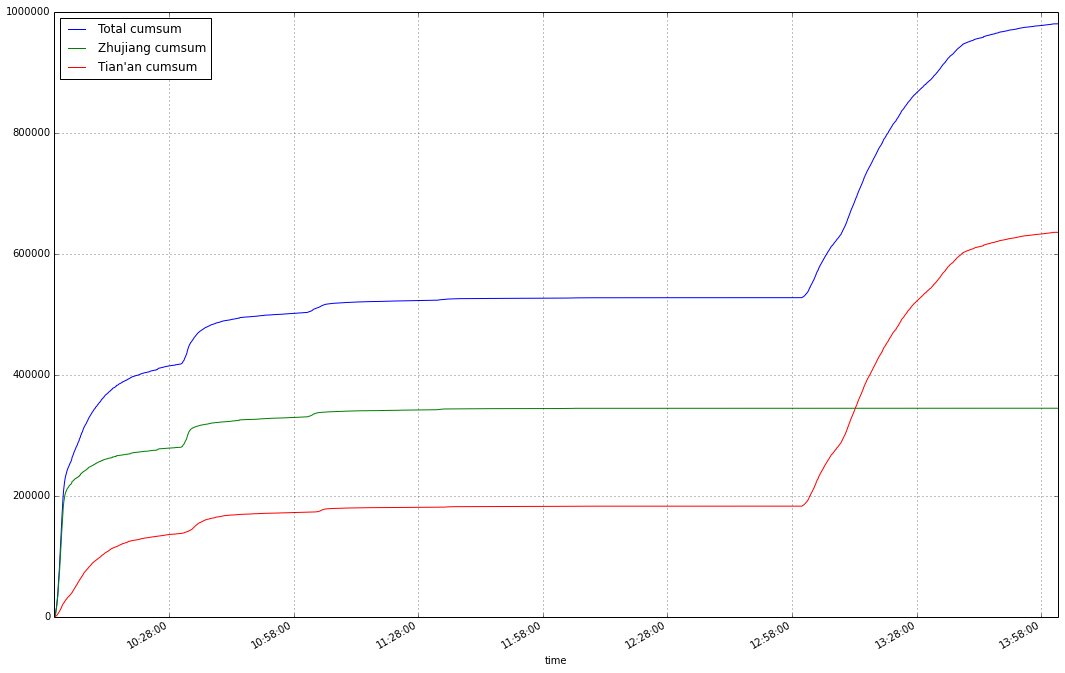
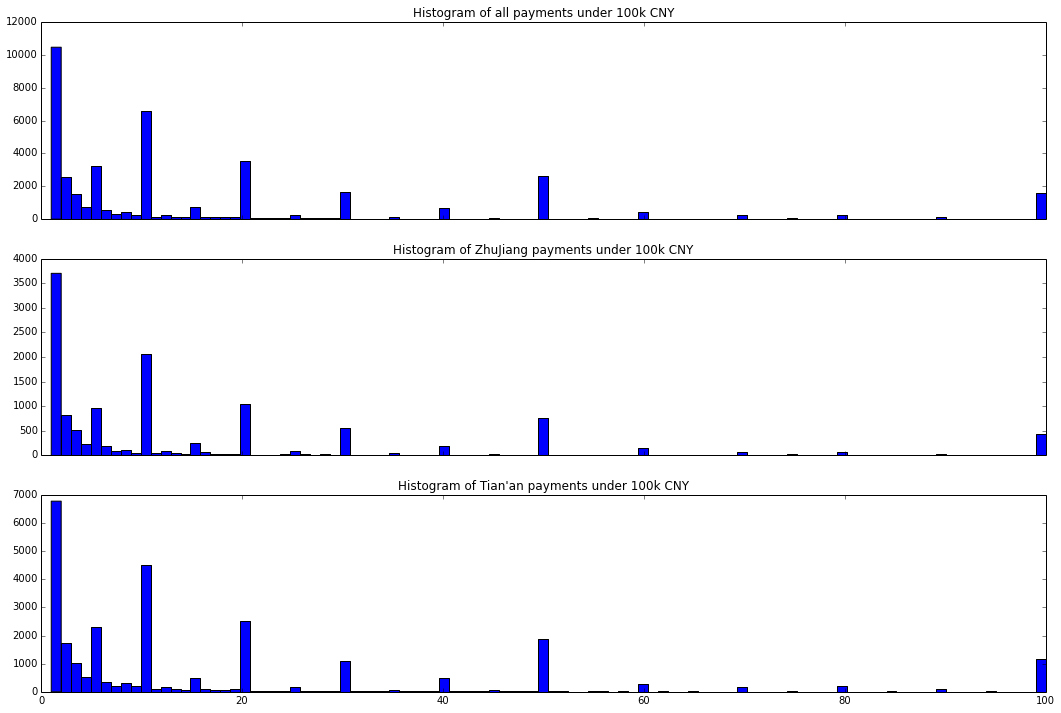
On that day (actually sold out in less than two hours in total) more than 40,000 people participated, resulting a total sales of almost one billion CNY (the exact number: 980,270,000 CNY). Two companies participated in this sales campaign: Zhujiang and Tian’an. The sales statistics are:

ZhujiangTian’anTotal
# of Customers138312909242923
Sales mean (k CNY)24.92205921.84700322.837872
Sales min (k CNY)111
Sales 25% (k CNY)122
Sales 50% (k CNY)101010
Sales 75% (k CNY)202522
Sales max (k CNY)10009001000
Sales total (k CNY)344697635573980270

The histograms of how many people pay for each amount.

le100kgt100kle100k

Zhujiang was extremely popular: in 2 minutes and 56 seconds it reached a sales of 200,212,000 CNY, that’s more than 1 million CNY sales PER SECOND! Indeed Chinese are crazy about online shopping. 😀

Leave a Comment

MapReduce in MongoDB

http://docs.mongodb.org/manual/core/map-reduce/

http://docs.mongodb.org/manual/reference/command/mapReduce/

> db.lattern_money_record.mapReduce( function() { emit(this.quantity, 1) }, function(key, values) { return Array.sum(values) }, {   query: {'quantity': {$gt: 500}}, out: {inline: 1} } )
{
	"results" : [
		{
			"_id" : 550,
			"value" : 3
		},
		{
			"_id" : 570,
			"value" : 1
		},
		{
			"_id" : 580,
			"value" : 1
		},
		{
			"_id" : 583,
			"value" : 1
		},
		{
			"_id" : 587,
			"value" : 1
		},
		{
			"_id" : 600,
			"value" : 2
		},
		{
			"_id" : 660,
			"value" : 1
		},
		{
			"_id" : 700,
			"value" : 2
		},
		{
			"_id" : 800,
			"value" : 5
		},
		{
			"_id" : 900,
			"value" : 2
		},
		{
			"_id" : 924,
			"value" : 1
		},
		{
			"_id" : 949,
			"value" : 1
		},
		{
			"_id" : 980,
			"value" : 1
		},
		{
			"_id" : 990,
			"value" : 1
		},
		{
			"_id" : 1000,
			"value" : 12
		}
	],
	"timeMillis" : 36,
	"counts" : {
		"input" : 35,
		"emit" : 35,
		"reduce" : 6,
		"output" : 15
	},
	"ok" : 1,
}

The MapReduce code I used to analyze the 20 million hotel reservation records:

def get_aggregation(collection):
    '''
    1. Get unique set of people
    2. Get most frequent users
    3. Get aggregation by location of birth, age, month and day of birth
    '''
    # Emit multiple times in mapper function:
    # http://docs.mongodb.org/manual/reference/command/mapReduce/
    mapper = Code('''
                  function() {
                    function validate_rid(id) {
                        // From: https://gist.github.com/foxwoods/1817822
                        // 18位身份证号
                        // 国家标准《GB 11643-1999》
                        function rid18(id) {
                            if(! /\d{17}[\dxX]/.test(id)) {
                                return false;
                            }
                            var modcmpl = function(m, i, n) { return (i + n - m % i) % i; },
                                f = function(v, i) { return v * (Math.pow(2, i-1) % 11); },
                                s = 0;
                            for(var i=0; i<17; i++) {
                                s += f(+id.charAt(i), 18-i);
                            }
                            var c0 = id.charAt(17),
                                c1 = modcmpl(s, 11, 1);
                            return c0-c1===0 || (c0.toLowerCase()==='x' && c1===10);
                        }

                        // 15位身份证号
                        // 2013年1月1日起将停止使用
                        // http://www.gov.cn/flfg/2011-10/29/content_1981408.htm
                        function rid15(id) {
                            var pattern = /[1-9]\d{5}(\d{2})(\d{2})(\d{2})\d{3}/,
                                matches, y, m, d, date;
                            matches = id.match(pattern);
                            y = +('19' + matches[1]);
                            m = +matches[2];
                            d = +matches[3];
                            date = new Date(y, m-1, d);
                            return (date.getFullYear()===y && date.getMonth()===m-1 && date.getDate()===d);
                        }

                        // return rid18(id) || rid15(id);
                        try {
                            ret = rid18(id) || rid15(id);
                            return ret;
                        } catch (err) {
                            return false;
                        }
                    }

                    function validateEmail(email) {
                        // http://stackoverflow.com/questions/46155/validate-email-address-in-javascript
                        var re = /^(([^<>()[\]\\.,;:\s@\"]+(\.[^<>()[\]\\.,;:\s@\"]+)*)|(\".+\"))@((\[[0-9]{1,3}\.[0-9]{1,3}\.[0-9]{1,3}\.[0-9]{1,3}\])|(([a-zA-Z\-0-9]+\.)+[a-zA-Z]{2,}))$/;
                        return re.test(email);
                    }

                    var str = this.CtfId;
                    if (str && validate_rid(str)) {
                        var prov = parseInt(str.slice(0, 2));
                        var year, month, day, sex;
                        if (str.length == 15) {
                            year = parseInt('19' + str.slice(6, 8));
                            month = parseInt(str.slice(8, 10));
                            day = parseInt(str.slice(10, 12));
                            sex = parseInt(str.slice(14, 15)) % 2 ? 'M' : 'F';
                        } else {
                            year = parseInt(str.slice(6, 10));
                            month = parseInt(str.slice(10, 12));
                            day = parseInt(str.slice(12, 14));
                            sex = parseInt(str.slice(16, 17)) % 2 ? 'M' : 'F';
                        }
                        var age = 2013 - year;
                        var valid_provs = [11, 12, 13, 14, 15,
                            21, 22, 23, 31, 32, 33, 34, 35, 36, 37,
                            41, 42, 43, 44, 45, 46,
                            50, 51, 52, 53, 54,
                            61, 62, 63, 64, 65,
                            71, 81, 82, 91];
                        if (age <= 0 || age > 100 ||
                            month <=0 || month > 12 ||
                            day <= 0 || day > 31 ||
                            valid_provs.indexOf(prov) == -1) {
                            emit('Corrupted', 1);
                        } else {
                            // emit('Province ' + prov, 1);
                            // emit('Age ' + age, 1);
                            // emit('Month ' + month, 1);
                            // emit('Day ' + day, 1);
                            // emit('Sex ' + sex, 1);
                            // emit('Prov ' + prov + ' Sex ' + sex, 1);
                            // if (this.Address && this.Address.length > 3) {
                            //     var cur_prov = this.Address.slice(0, 3);
                            //     emit('From ' + prov + ' to ' + cur_prov, 1);
                            // }

                            // var email = this.EMail;
                            // if (email && validateEmail(email)) {
                            //     var idx = email.lastIndexOf('@');
                            //     var domain = email.slice(idx + 1);
                            //     emit(domain.toLowerCase(), 1);
                            // }

                            if (prov == 32 && sex == 'M') {
                                emit(str, 1);
                            }
                            // if (prov == 32 && sex == 'F') {
                            //     emit(str, 1);
                            // }
                        }
                    } else {
                        emit('Corrupted', 1);
                    }
                  }''')
    reducer = Code('''
                   function(key, values) {
                    return Array.sum(values);
                   }''')
    result = collection.map_reduce(
        mapper, reducer, 'aggregation', query={'CtfTp': 'ID'}
    )
    return result


Leave a Comment

Debugging Apache configuration files on Mac OS X

Sometimes I make some modification to my site’s apache config and apache stops functioning, but I cannot get enough information from /var/log/apache2/error.log. Here’s a command that will tell you where the problem is:

sudo /usr/sbin/httpd -k start -e Debug -E /dev/stdout

It starts apache for debugging and prints out the messages on screen, so that hopefully you can find something useful.

Leave a Comment

mod_wsgi and mod_xsendfile on OS X 10.9 Mavericks

Updated on Nov 4, 2013: The following tricks may still work, however I have found a much easier solution. Simply install Xcode command line developer tools and you should be able to compile source code without issues:

$ xcode-select --install

After upgrading my Mac from 10.8 to 10.9 Mavericks my apache stopped working, so I have to reinstall mod_wsgi and mod_xsendfile. However, tricks are needed to compile and install these mods successfully.

Upgrade Xcode

Upgrade Xcode in App Store. As mentioned by Valerie:

I had to manually upgrade Xcode (after Mavericks upgrade) from the App Store & agree to its license because ./configure hung forever until I did that.

mod_wsgi

For mod_wsgi installation, create a soft link to OSX10.9.xctoolchain:

cd /Applications/Xcode.app/Contents/Developer/Toolchains/
sudo ln -s XcodeDefault.xctoolchain OSX10.9.xctoolchain

Then run configure under mod_wsgi source code directory:

mod_wsgi-3.4$ ./configure

It will generate a Makefile similar as follows:

#  Copyright 2007 GRAHAM DUMPLETON                                               
#                                                                                
#  Licensed under the Apache License, Version 2.0 (the "License");               
#  you may not use this file except in compliance with the License.              
#  You may obtain a copy of the License at                                       
#                                                                                
#      http://www.apache.org/licenses/LICENSE-2.0                                
#                                                                                
#  Unless required by applicable law or agreed to in writing, software           
#  distributed under the License is distributed on an "AS IS" BASIS,             
#  WITHOUT WARRANTIES OR CONDITIONS OF ANY KIND, either express or implied.      
#  See the License for the specific language governing permissions and           
#  limitations under the License.                                                

APXS = /usr/sbin/apxs                                                            
PYTHON = /usr/local/bin/python                                                   

DESTDIR =                                                                        
LIBEXECDIR = /usr/libexec/apache2                                                

CPPFLAGS =  -I/usr/local/Cellar/python/2.7.5/Frameworks/Python.framework/Versions/2.7/include/python2.7 -DNDEBUG 
CFLAGS =   -Wc,'-arch x86_64'                                                    
LDFLAGS =  -Wl,-F/usr/local/Cellar/python/2.7.5/Frameworks -framework Python -u _PyMac_Error   -arch x86_64
LDLIBS =  -ldl  -framework CoreFoundation                                        

all : mod_wsgi.la                                                                

mod_wsgi.la : mod_wsgi.c                                                         
    $(APXS) -c $(CPPFLAGS) $(CFLAGS) mod_wsgi.c $(LDFLAGS) $(LDLIBS)             

$(DESTDIR)$(LIBEXECDIR) :                                                        
    mkdir -p $@                                                                  

install : all $(DESTDIR)$(LIBEXECDIR)                                            
    $(APXS) -i -S LIBEXECDIR=$(DESTDIR)$(LIBEXECDIR) -n 'mod_wsgi' mod_wsgi.la 

clean :                                                                          
    -rm -rf .libs                                                                
    -rm -f mod_wsgi.o mod_wsgi.la mod_wsgi.lo mod_wsgi.slo mod_wsgi.loT          
    -rm -f config.log config.status                                              
    -rm -rf autom4te.cache                                                       

distclean : clean                                                                
    -rm -f Makefile Makefile.in                                                  

realclean : distclean                                                            
    -rm -f configure

However, this Makefile is not correct and running ‘make’ the compiler will complain something like:

mod_wsgi.c:34:10: fatal error: 'httpd.h' file not found

Prepend the following line to CPPFLAGS value:

-I/Applications/Xcode.app/Contents/Developer/Platforms/MacOSX.platform/Developer/SDKs/MacOSX10.9.sdk/usr/include -I/Applications/Xcode.app/Contents/Developer/Platforms/MacOSX.platform/Developer/SDKs/MacOSX10.9.sdk/usr/include/apr-1 -I/Applications/Xcode.app/Contents/Developer/Platforms/MacOSX.platform/Developer/SDKs/MacOSX10.9.sdk/usr/include/apache2

Save the Makefile and it will look something like:

#  Copyright 2007 GRAHAM DUMPLETON                                               
#                                                                                
#  Licensed under the Apache License, Version 2.0 (the "License");               
#  you may not use this file except in compliance with the License.              
#  You may obtain a copy of the License at                                       
#                                                                                
#      http://www.apache.org/licenses/LICENSE-2.0                                
#                                                                                
#  Unless required by applicable law or agreed to in writing, software           
#  distributed under the License is distributed on an "AS IS" BASIS,             
#  WITHOUT WARRANTIES OR CONDITIONS OF ANY KIND, either express or implied.      
#  See the License for the specific language governing permissions and           
#  limitations under the License.                                                

APXS = /usr/sbin/apxs                                                            
PYTHON = /usr/local/bin/python                                                   

DESTDIR =                                                                        
LIBEXECDIR = /usr/libexec/apache2                                                

CPPFLAGS =  -I/Applications/Xcode.app/Contents/Developer/Platforms/MacOSX.platform/Developer/SDKs/MacOSX10.9.sdk/usr/include -I/Applications/Xcode.app/Contents/Developer/Platforms/MacOSX.platform/Developer/SDKs/MacOSX10.9.sdk/usr/include/apr-1 -I/Applications/Xcode. app/Contents/Developer/Platforms/MacOSX.platform/Developer/SDKs/MacOSX10.9.sdk/usr/include/apache2 -I/usr/local/Cellar/python/2.7.5/Frameworks/Python.framework/Versions/2.7/include/python2.7 -DNDEBUG
CFLAGS =   -Wc,'-arch x86_64'                                                             
LDFLAGS =  -Wl,-F/usr/local/Cellar/python/2.7.5/Frameworks -framework Python -u _PyMac_Error   -arch x86_64
LDLIBS =  -ldl  -framework CoreFoundation                                        

all : mod_wsgi.la                                                                

mod_wsgi.la : mod_wsgi.c                                                         
    $(APXS) -c $(CPPFLAGS) $(CFLAGS) mod_wsgi.c $(LDFLAGS) $(LDLIBS)             

$(DESTDIR)$(LIBEXECDIR) :                                                        
    mkdir -p $@                                                                  

install : all $(DESTDIR)$(LIBEXECDIR)                                            
    $(APXS) -i -S LIBEXECDIR=$(DESTDIR)$(LIBEXECDIR) -n 'mod_wsgi' mod_wsgi.la 

clean :                                                                          
    -rm -rf .libs                                                                
    -rm -f mod_wsgi.o mod_wsgi.la mod_wsgi.lo mod_wsgi.slo mod_wsgi.loT          
    -rm -f config.log config.status                                              
    -rm -rf autom4te.cache                                                       

distclean : clean                                                                
    -rm -f Makefile Makefile.in                                                  

realclean : distclean                                                            
    -rm -f configure

Then make && install:

mod_wsgi-3.4$ make
mod_wsgi-3.4$ sudo make install

Modify /etc/apache2/httpd.conf to enable mod_wsgi:

LoadModule wsgi_module libexec/apache2/mod_wsgi.so

mod_xsendfile

Use the following command to compile and install mod_xsendfile:

sudo apxs -I/Applications/Xcode.app/Contents/Developer/Platforms/MacOSX.platform/Developer/SDKs/MacOSX10.9.sdk/usr/include -I/Applications/Xcode.app/Contents/Developer/Platforms/MacOSX.platform/Developer/SDKs/MacOSX10.9.sdk/usr/include/apr-1 -I/Applications/Xcode.app/Contents/Developer/Platforms/MacOSX.platform/Developer/SDKs/MacOSX10.9.sdk/usr/include/apache2 -cia mod_xsendfile.c

Enabling HTTPS/SSL

After upgrading OS X the apache configuration was reset, but your original config is save to /etc/apache2/httpd.conf.pre-update. I need to enable SSL in httpd.conf again by uncommenting the following line:

# Include /private/etc/apache2/extra/httpd-ssl.conf

Restart Apache and everything should work fine

sudo apachectl restart
3 Comments

Solution: dd too slow on Mac OS X

When I was cloning SD cards on Mac OS X using `dd’, it takes ages to get things done. I was using the following command:

diskutil unmountDisk /dev/disk2
sudo dd bs=1m if=~/Downloads/2013-10-09.alice.img of=/dev/disk2

It takes much less time when using /dev/rdisk2 instead of /dev/disk2:

diskutil unmountDisk /dev/disk2
sudo dd bs=1m if=~/Downloads/2013-10-09.alice.img of=/dev/rdisk2

The reason is that rdisks are “raw” thus resulting in a higher R/W speed, according to `man hdiutil` [1]:

/dev/rdisk nodes are character-special devices, but are “raw” in the BSD sense and force block-aligned I/O. They are closer to the physical disk than the buffer cache. /dev/disk nodes, on the other hand, are buffered block-special devices and are used primarily by the kernel’s filesystem code.

[1] http://superuser.com/questions/631592/mac-osx-why-is-dev-rdisk-20-times-faster-than-dev-disk

58 Comments

Facebook vs. Google advertisements

Since last week I’ve been investigating how to efficiently promote our website (yabroad.com). Our Facebook page got 139 likes a week ago, and now we have 175. Among the 36 new likes, 22 are from two Facebook campaigns. The first campaign cost 15 dollars and earned 20 likes, averaging 0.75 dollars per like with a click-through rate of 0.290%. In a way this is affordable and more efficiently than stand at international students’ dormitory in Shanghai and spread flyers. Three of us probably sent out around 100 flyers to international students but got nothing to our Facebook page nor website. The first campaign focused on gaining new likes and it went quite well; our second campaign cost 5 dollars, promoting a video post with a goal to earn new likes. This campaign boosted another 2,169 reach, 143 clicks and 2 new likes. Had the video been more engaging, probably we could have gotten more clicks, shares and likes. Since Facebook users nowadays are exposed more and more to various contents, it’s become increasingly difficult to get users engaged.

In the meanwhile, we also launched three campaigns on Google Adwords. So far we got 30 clicks and cost about 40 dollars. The average CPC is $1.36 — almost twice of that for FB, but the conversion rate is zero. No one has applied or enquired our pages (maybe due to the low volume). Google Adwords is different from Facebook. On Facebook you attract people to your FB page but not your website; whereas Google takes visitors directly to your website. FB leaves you a space for imagination, though. Once you get a page like from someone, he/she will be able to see the updates your page posts.

Suppose the Google CPC is twice of Facebook CPC, if one in two earned FB followers click one of our promoted posts, FB is doing better. That does not sound like a issue. I’d place all my bet on Facebook and maybe time to buy FB shares?

We also tried to promote on LinkedIn but failed to find appropriate ways. LinkedIn is mainly for serious jobs, not internships. Instagram neither, there seems to be a lot of robots on Instagram; it’s not clear for us to find a way to promote ourselves, either. So for the moment, we only consider Facebook and Google. Oh no, Facebook is our focus and Google is not helping much, but we still need to spend the remaining 90 dollars we got from a coupon, slowly.

Leave a Comment

A “normal” sed on Mac

The `sed` program on Mac is not a standard (GNU) one. To get the normal one, use brew:

brew install gnu-sed

After this, alter PATH. For example, add the following line to your `~/.bash_profile`:

PATH="/usr/local/opt/gnu-sed/libexec/gnubin:$PATH"

And now you have a normal sed!


2 Comments

Tastypie error handling with Unauthorized Exception

In Tastypie v0.9.15 unauthorized exception messages are not included in the response. The cause lies in the following code: (tastypie/resources.py, Line 601-602 in v0.9.15)

    def unauthorized_result(self, exception):
        raise ImmediateHttpResponse(response=http.HttpUnauthorized())

In the above snippet an empty response is returned, without including messages in `exception`.

In order to fix this, you can override this method in your model resources, for example:

    def unauthorized_result(self, exception):
        """Override tastypie method to return a reasonable error response."""
        raise ImmediateHttpResponse(
            response=HttpUnauthorized(
                json.dumps({'error': exception.message})
            )
        )

Hi, the company I’m working for (yabroad.com) is hiring Website Backend and Frontend Developers to our platform team. We are building an open platform for youngsters to travel beyond boarders and we offer youngsters internship, language study, travel and volunteer opportunities. Please contact me if you are interested.

Leave a Comment

Upgrading Tastypie from v0.9.11 to v0.9.12 and above

Here are my notes on how to upgrade Tastypie from version 0.9.11 to 0.9.12, as there’re no release notes for v0.9.12. Release notes for 0.9.13 and above are available here: http://django-tastypie.readthedocs.org/en/latest/release_notes/index.html.

1. override_urls() becomes prepend_urls(), the new name makes more sense since what the function does is to insert customized urls instead of replacing the default urls with your customized urls.

2. obj_* methods accepts different parameters. Before:

def obj_get(self, request=None, **kwargs):
    pass

Now obj_get, obj_create, etc. accepts bundle as the parameter apart from keyword arguments. You can get request object from the bundle:

def obj_get(self, bundle, **kwargs):
    request = bundle.request
    pass

3. apply_authorization_limits is no longer in use and it’s replace with a finer grained authorization mechanism. For example:

from tastypie.authorization import Authorization
from tastypie.exceptions import Unauthorized

class ProgramAuthorization(Authorization):
    def read_list(self, object_list, bundle):
        user = bundle.request.user
        if user.is_authenticated() and user.is_staff:
            return object_list
        else:
            return object_list.filter(is_published=True)

    def read_detail(self, object_list, bundle):
        if bundle.request.user.is_staff or bundle.obj.is_published:
            return True
        raise Unauthorized()

    def create_list(self, object_list, bundle):
        raise Unauthorized()

    def create_detail(self, object_list, bundle):
        if bundle.request.user.is_staff:
            return True
        raise Unauthorized()

    def update_list(self, object_list, bundle):
        raise Unauthorized()

    def update_detail(self, object_list, bundle):
        if bundle.request.user.is_staff:
            return True
        raise Unauthorized()

    def delete_list(self, object_list, bundle):
        raise Unauthorized()

    def delete_detail(self, object_list, bundle):
        raise Unauthorized()

Please note that *_list methods should return a list or raise exceptions; whereas *_detail methods should return boolean values or raise exceptions. For more information, see: http://django-tastypie.readthedocs.org/en/v0.9.12/authorization.html

Hi, the company I’m working for (yabroad.com) is hiring Website Backend and Frontend Developers to our platform team. We are building an open platform for youngsters to travel beyond boarders and we offer youngsters internship, language study, travel and volunteer opportunities. Please contact me if you are interested.

Leave a Comment

OpenVPN client TLS-Auth problem on Windows

It seems that the OpenVPN Client on windows does not support TLS-Auth with a separate key file. So instead, you can paste your key contents in your openvpn client’s config file and use some thing like the following (inline ta.key):

client
dev tun
proto udp

# enter the server's hostname
# or IP address here, and port number
remote server_ip port_number

resolv-retry infinite
nobind
persist-key
persist-tun

# Use the full filepaths to your
# certificates and keys
ca "C:\\yabroad.tblk\\ca.crt"
cert "C:\\yabroad.tblk\\client.crt"
key "C:\\yabroad.tblk\\client.key"

key-direction 1

<tls-auth>
#
# 2048 bit OpenVPN static key
#
-----BEGIN OpenVPN Static key V1-----
xxxxxxxxxxxxxxxxxxxxxxxxxxxxxxxx
-----END OpenVPN Static key V1-----
</tls-auth>


ns-cert-type server
comp-lzo
verb 1

When not using the above but using something like:

tls-auth ta.key 1  # which works for tunnelblick

The server log shows something like:

Thu Apr 18 20:55:26 2013 TLS Error: incoming packet authentication failed from [AF_INET] IP_ADDRESS:60454
Thu Apr 18 20:55:57 2013 Authenticate/Decrypt packet error: packet HMAC authentication failed
20 Comments

funf smart phone data collecting

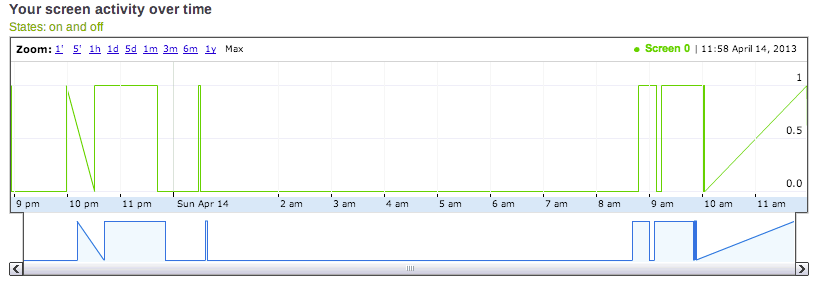
读完几本大数据的书,偶然发现了一个叫funf的手机应用,号称能将安卓手机变身为数据收集器。于是我很兴奋的下载安装,让这个app在我手机上采集了两天的数据,分析得到的结果如下:

battery_life phone_temperature relative_activity screen_activity


老实说,收集了两天的数据,就能分析出这么点东西,着实让人失望。不过这个生成图像信息的程序是开源的,而且是用Python实现的,今后有空了也可以自己来分析一下收集到的数据。funf在我的手机上也经常不能响应,可以说这个app是十足的半成品。不过这个由来自MIT的团队开发的不仅仅是一个手机app,号称是一个Open Sensing Framework,前几天还刚刚被Google收购了。虽然是个半成品,但Google这个时候收购团队总比让他们羽翼丰满之后再收购所花的代价要小得多。

Leave a Comment