Skip to content →

Category: Miscellaneous

Apple Magic Mouse on Windows 11

To install driver for Apple Magic Mouse on Windows 11 and enable scrolling, follow these steps:

  1. Download driver from https://support.apple.com/kb/DL1837?locale=en_US
  2. Extract the AppleWirelessMouse64.exe file from bootcamp5.1.5769.zip\BootCamp\Drivers\Apple
  3. Install AppleWirelessMouse64.exe
  4. Remove Magic Mouse device in Windows Bluetooth
  5. Switch off Magic Mouse and swith it back on
  6. Add a new Bluetooth device

References:

  1. https://discussions.apple.com/thread/8521118
  2. https://www.youtube.com/watch?v=znpMBFD0ZR0&ab_channel=Petiksmode
  3. https://magicutilities.net/ (paid software with free trial)
Leave a Comment

Configure Selenium and Chrome to use Tor proxy

I’ve been trying to configure Selenium and Chrome to use Tor as proxy and constantly getting error messages like the following:

WebDriverException: Message: invalid argument: cannot parse capability: proxy
from invalid argument: Specifying ‘socksProxy’ requires an integer for ‘socksVersion’
(Driver info: chromedriver=2.44.609545 (c2f88692e98ce7233d2df7c724465ecacfe74df5),platform=Mac OS X 10.14.0 x86_64)

In the end I have to use HTTP proxy instead of SOCKS.

Install and start Tor:

brew install tor
brew services start tor

Install privoxy:

brew install privoxy

Configure privoxy (vi /usr/local/etc/privoxy/config) to chain it with Tor:

forward-socks5t   /               127.0.0.1:9050 .

Start privoxy by default on port 8118:

brew services start privoxy

Check if your traffic is proxied:

from selenium.webdriver.common.proxy import Proxy, ProxyType
from selenium import webdriver

prox = Proxy()
prox.proxy_type = ProxyType.MANUAL
prox.http_proxy = "http://localhost:8118"
prox.ssl_proxy = "http://localhost:8118"

capabilities = webdriver.DesiredCapabilities.CHROME
prox.add_to_capabilities(capabilities)


options = webdriver.ChromeOptions()
options.binary_location = '/Applications/Google Chrome.app/Contents/MacOS/Google Chrome'
# options.add_argument('headless')
# set the window size
options.add_argument('window-size=1881x1280')

# initialize the driver
driver = webdriver.Chrome(options=options, desired_capabilities=capabilities)

driver.get('http://httpbin.org/ip')

Now you should see a different IP than your real one.

Leave a Comment

Docker Postgres “PANIC: could not locate a valid checkpoint record”

It seemed that my Postgres database was not properly shut down when rebooting and when I tried to use docker-compose to start it again, the following message was shown in `docker logs`:

PANIC:  could not locate a valid checkpoint record
LOG:  startup process (PID 23) was terminated by signal 6: Aborted
LOG:  aborting startup due to startup process failure
LOG:  database system is shut down
LOG:  database system was interrupted; last known up at 2017-09-14 08:22:04 UTC
LOG:  unexpected pageaddr B/68B26000 in log segment 000000010000000B0000006D, offset 11689984
LOG:  invalid primary checkpoint record
LOG:  unexpected pageaddr B/688F2000 in log segment 000000010000000B0000006D, offset 9379840
LOG:  invalid secondary checkpoint record

To fix this, first shut down this container (docker-compose down), then start the container in interactive mode:

daoyuan.li:~/Projects/magic/stock$ docker run -it -v /Users/daoyuan.li/Projects/magic/postgres_data:/var/lib/postgres/data postgres:9.6 /bin/bash
root@c4d2fb7edcea:/# gosu postgres pg_resetxlog -f /var/lib/postgres/data
Transaction log reset
root@c4d2fb7edcea:/# exit

After the transaction log is reset, everything should be fine. Now you can start your containers again (docker-compose up -d).

Leave a Comment

Migrating/Installing Prestashop to Amazon AWS EC2

Recently I migrated a Prestashop website to AWS/EC2 and the process is quite smooth. Here’s how to do it.

1. Get your Website data: including Prestashop website files and a latest database dump. Remove all the files except index.php in /cache/smarty/compile and /cache/smarty/cache. (See here.)

2. Launch your EC2 instance. But before doing that, check first if a pre-configured or managed Prestashop is available in your preferred region (more info here). If not, choose the appropriate instance type and get it running. In my case I chose Ubuntu Linux.

3. Install the AMP (Apache, MySQL and PHP). On Ubuntu you can simply do it with a few simple commands:

sudo apt-get update
sudo apt-get upgrade
sudo tasksel install lamp-server
sudo apt-get install phpmyadmin

Make sure that you remember your password for MySQL root user and phpmyadmin user.

4. Copy your database dump and website files to your EC2 instance using scp, for instance:

scp -i you-key.pem files.tar.gz ubuntu@your-ec2-instance.compute.amazonaws.com

5. Create a MySQL user for Prestashop, you don’t want to use the root user for this purpose. You can do this using phpmyadmin or a command line. Also, create a database for Prestashop and grant the user you’ve created just now all privileges on this database.

6. Import your database from the dump:

mysql -u root -p ps < db_dump.sql

7. Extract your website files on your EC2 instance. In my case, inside /var/www/html/. If there is an index.html file inside this directory, remove it first. Make sure you set the correct user and group to all the website files:

sudo chown -R www-data:www-data *
sudo chmod -R 755 *

Note that if don’t set the correct permissions, you may get complaints from Apache, like the following:

PHP Fatal error:  Uncaught exception ‘SmartyException’ with message ‘unable to write file /var/www/html/cache/smarty/compile/46/d9/69/wrt54ecd6c1856a72.61943173’ in /var/www/html/tools/smarty/sysplugins/smarty_internal_write_file.php:44

Stack trace:

#0 /var/www/html/tools/smarty/sysplugins/smarty_internal_template.php(201): Smarty_Internal_Write_File::writeFile(‘/var/www/html/c…’, ‘<?php /* Smarty…’, Object(Smarty))

#1 /var/www/html/tools/smarty/sysplugins/smarty_internal_templatebase.php(155): Smarty_Internal_Template->compileTemplateSource()

#2 /var/www/html/classes/controller/AdminController.php(1936): Smarty_Internal_TemplateBase->fetch(‘controllers/mod…’)

#3 /var/www/html/classes/controller/AdminController.php(2337): AdminControllerCore->initModal()

#4 /var/www/html/classes/controller/Controller.php(163): AdminControllerCore->init()

#5 /var/www/html/classes/Dispatcher.php(373): ControllerCore->run()

#6 /var/www/html/admin123/index.php(54): DispatcherCore->dispatch()

#7 {main}\n  thrown in /var/www/html/tools/smarty/sysplugins/smarty_internal_write_file.php on line 44

8. Enable mcrypt for PHP:

sudo updatedb
locate mcrypt.ini
> /etc/php5/mods-available/mcrypt.ini
locate mcrypt.so
> /usr/lib/libmcrypt.so.4
> /usr/lib/libmcrypt.so.4.4.8
> /usr/lib/php5/20121212/mcrypt.so
sudo vi /etc/php5/mods-available/mcrypt.ini
sudo php5enmod mcrypt
ls -al /etc/php5/cli/conf.d/20-mcrypt.ini
> lrwxrwxrwx 1 root root 31 Feb 24 19:32 /etc/php5/cli/conf.d/20-mcrypt.ini -> ../../mods-available/mcrypt.ini
ls -al /etc/php5/apache2/conf.d/20-mcrypt.ini
> lrwxrwxrwx 1 root root 31 Feb 24 19:32 /etc/php5/apache2/conf.d/20-mcrypt.ini -> ../../mods-available/mcrypt.ini
service apache2 restart

9. Update your Prestashop settings in the config/settings.inc.php file. Set the correct database information.

10. Enable mod_rewrite:

sudo a2enmod rewrite
sudo service apache2 restart

Also, make sure to add something like the following in your apache site configuration file:

        <Directory />
                Options FollowSymLinks
                AllowOverride all
        </Directory>
        <Directory /var/www/html/>
                Options Indexes FollowSymLinks MultiViews
                AllowOverride all
                Order allow,deny
                allow from all
        </Directory>

And then remember to restart your apache server.

11. Install sendmail:

sudo apt-get install sendmail

12. Go to your Prestashop back office and reconfigure your domain. Go to Preferences -> SEO & URLs and scroll down to Set shop URL section.

Now everything should be OK, your new Prestashop website is available on your new domain!

If you have any issues, just drop a line here or email me.

4 Comments

WordPress pages load very slowly after Google is blocked

After Google is completely blocked in China since May 31, I’ve had problems loading my website. After some investigation I found out the problem lies in loading failure of Google Fonts. Since it takes a long time to fail, the page waits before it fails and display with the fallback styles.

To solve the problem, I crawled the font styles from Google and put it up on my server. Then I changed the WordPress theme to use the font style on the server. Everything seems to work perfectly after that.

Another option would be completely disable Google Font Styles. This can be easily done using the WP plugin “Disable Google Fonts”, if you’re using WP’s default twenty-* themes. In my case, I would have to comment out two lines in Mog Theem Functions file (functions.php). Since my theme relies on Google Fonts, instead of commenting out the lines, I changed these to lines to use the localized style file:

	//wp_enqueue_style( 'opensans', 'http://fonts.googleapis.com/css?family=Open+Sans');
	//wp_enqueue_style( 'josefinslab', 'http://fonts.googleapis.com/css?family=Josefin+Slab:600');
	wp_enqueue_style( 'opensans', '/gfonts.css');
	wp_enqueue_style( 'josefinslab', '/gfonts.css');


Leave a Comment

Raspberry Pi as a toy web server

1. Tell my router to route certain traffic to the Raspberry Pi. For example, I route HTTP and SSH traffic to one of my Pi’s. I disabled password login for  SSH, using public key authentication instead: in /etc/ssh/sshd_config, use the following setting and restart SSH service using `sudo service ssh restart’.

RSAAuthentication yes
PubkeyAuthentication yes

# To disable password authentication:
ChallengeResponseAuthentication no
PasswordAuthentication no
UsePAM no

# To disable root login:
PermitRootLogin no

2. Getting my IP address of the Raspberry Pi. I firstly created a PHP script on my domain to record the IP address in a text file.

<?php                                                                            
                                                                                 
$token = 'secret';                   
                                                                                 
if ($_GET['token'] == $token) {                                                  
    if (!empty($_SERVER['HTTP_CLIENT_IP'])) {                                    
        $ip = $_SERVER['HTTP_CLIENT_IP'];                                        
    } elseif (!empty($_SERVER['HTTP_X_FORWARDED_FOR'])) {                        
        $ip = $_SERVER['HTTP_X_FORWARDED_FOR'];                                  
    } else {                                                                     
        $ip = $_SERVER['REMOTE_ADDR'];                                           
    }                                                                            
    $fp = fopen('home_ip.txt', 'w');                                             
    fwrite($fp, $ip);                                                            
}                                                                                
                                                                                 
?>

Then tell the Raspberry Pi to report its IP address every 5 minutes, using crontab:

pi@alice ~ $ crontab -l
*/5 * * * * curl daoyuan.li/home_ip.php?token=secret

After a while the IP address is recorded in the text file and updated every 5 minutes.

3. Optionally create a DNS record for the Pi. I use Cloudflare to manage DNS settings by myself, so just add/update an entry in Cloudflare’s settings. I point pi.daoyuan.li to the IP address of one Pi. This can be done automatically in the future.

4. Install Flask on the Pi.

sudo apt-get update
sudo apt-get install python-pip
sudo pip install Flask

5. Install nginx and uwsgi on the Pi.

sudo apt-get install nginx
sudo apt-get install build-essential python python-dev
sudo apt-get install python-virtualenv
sudo pip install uwsgi

6. Set up nginx along with uwsgi and Flask.

mkdir flask && cd $_
virtualenv env
. env/bin/activate
pip install Flask

Edit nginx config:

~/flask $ cat flask_nginx.conf 
server {
    listen      5000;
    server_name localhost;
    charset     utf-8;
    client_max_body_size 75M;

    location / { try_files $uri @flask; }
    location @flask{
        include uwsgi_params;
        uwsgi_pass unix:/home/pi/flask/uwsgi.sock;
    }
}
sudo rm /etc/nginx/sites-enabled/default
sudo ln -s flask_nginx.conf /etc/nginx/sites-enabled/default 
sudo service nginx restart

Edit uwsgi config:

~/flask $ cat flask_uwsgi.ini 
[uwsgi]
#application's base folder
base = /home/pi/flask

#python module to import
app = hello
module = %(app)

home = %(base)/env
pythonpath = %(base)

#socket file's location
socket = /home/pi/flask/uwsgi.sock

#permissions for the socket file
chmod-socket    = 666

#the variable that holds a flask application inside the module imported at line #6
callable = app

#location of log files
logto = /home/pi/flask/uwsgi.log

Create a simple Flask app:

~/flask $ cat hello.py
from flask import Flask
app = Flask(__name__)

@app.route("/")
def hello():
    return "Hello World!"

if __name__ == "__main__":
    app.run()

Start up uwsgi:

uwsgi --ini flask_uwsgi.ini &

7. Done! http://pi.daoyuan.li:5000/

 Update on June 24, 2014:

Getting the external address in step 2 can be done by running this command in Raspberry Pi:

curl ifconfig.me

See: http://www.commandlinefu.com/commands/view/5427/get-your-external-ip-address

Leave a Comment

NumPy’s ndarray indexing

In NumPy a new kind of array is provided: n-dimensional array or ndarray. It’s usually fixed-sized and accepts items of the same type and size. For example, to define a 2×3 matrix:

import numpy as np
a = np.array([[1,2,3,], [4,5,6]], np.int32)

When indexing ndarray, it supports “array indexing” other than single element indexing.  (See http://docs.scipy.org/doc/numpy/user/basics.indexing.html)

It is possible to index arrays with other arrays for the purposes of selecting lists of values out of arrays into new arrays. There are two different ways of accomplishing this. One uses one or more arrays of index values. The other involves giving a boolean array of the proper shape to indicate the values to be selected. Index arrays are a very powerful tool that allow one to avoid looping over individual elements in arrays and thus greatly improve performance.

So you basically can do the following:

a = np.array([1, 2, 3], np.int32)
a[np.array([0, 2])) # Fetch the first the third elements, returns np.array([1, 3])
a[np.array([True, False, True])] # Same as the line above

Besides, when you do equals operation on ndarrays, another ndarray is returned by comparing each element:

a = np.array([1, 2, 3], np.int32)
a == 2 # Returns array([False,  True, False], dtype=bool)
a != 2 # Returns array([ True, False,  True], dtype=bool)
a[a != 2] # Returns a sub array that excludes elements with a value 2, in this case array([1, 3], dtype=int32)
Leave a Comment

Debugging Apache configuration files on Mac OS X

Sometimes I make some modification to my site’s apache config and apache stops functioning, but I cannot get enough information from /var/log/apache2/error.log. Here’s a command that will tell you where the problem is:

sudo /usr/sbin/httpd -k start -e Debug -E /dev/stdout

It starts apache for debugging and prints out the messages on screen, so that hopefully you can find something useful.

Leave a Comment

Facebook vs. Google advertisements

Since last week I’ve been investigating how to efficiently promote our website (yabroad.com). Our Facebook page got 139 likes a week ago, and now we have 175. Among the 36 new likes, 22 are from two Facebook campaigns. The first campaign cost 15 dollars and earned 20 likes, averaging 0.75 dollars per like with a click-through rate of 0.290%. In a way this is affordable and more efficiently than stand at international students’ dormitory in Shanghai and spread flyers. Three of us probably sent out around 100 flyers to international students but got nothing to our Facebook page nor website. The first campaign focused on gaining new likes and it went quite well; our second campaign cost 5 dollars, promoting a video post with a goal to earn new likes. This campaign boosted another 2,169 reach, 143 clicks and 2 new likes. Had the video been more engaging, probably we could have gotten more clicks, shares and likes. Since Facebook users nowadays are exposed more and more to various contents, it’s become increasingly difficult to get users engaged.

In the meanwhile, we also launched three campaigns on Google Adwords. So far we got 30 clicks and cost about 40 dollars. The average CPC is $1.36 — almost twice of that for FB, but the conversion rate is zero. No one has applied or enquired our pages (maybe due to the low volume). Google Adwords is different from Facebook. On Facebook you attract people to your FB page but not your website; whereas Google takes visitors directly to your website. FB leaves you a space for imagination, though. Once you get a page like from someone, he/she will be able to see the updates your page posts.

Suppose the Google CPC is twice of Facebook CPC, if one in two earned FB followers click one of our promoted posts, FB is doing better. That does not sound like a issue. I’d place all my bet on Facebook and maybe time to buy FB shares?

We also tried to promote on LinkedIn but failed to find appropriate ways. LinkedIn is mainly for serious jobs, not internships. Instagram neither, there seems to be a lot of robots on Instagram; it’s not clear for us to find a way to promote ourselves, either. So for the moment, we only consider Facebook and Google. Oh no, Facebook is our focus and Google is not helping much, but we still need to spend the remaining 90 dollars we got from a coupon, slowly.

Leave a Comment

OpenVPN client TLS-Auth problem on Windows

It seems that the OpenVPN Client on windows does not support TLS-Auth with a separate key file. So instead, you can paste your key contents in your openvpn client’s config file and use some thing like the following (inline ta.key):

client
dev tun
proto udp

# enter the server's hostname
# or IP address here, and port number
remote server_ip port_number

resolv-retry infinite
nobind
persist-key
persist-tun

# Use the full filepaths to your
# certificates and keys
ca "C:\\yabroad.tblk\\ca.crt"
cert "C:\\yabroad.tblk\\client.crt"
key "C:\\yabroad.tblk\\client.key"

key-direction 1

<tls-auth>
#
# 2048 bit OpenVPN static key
#
-----BEGIN OpenVPN Static key V1-----
xxxxxxxxxxxxxxxxxxxxxxxxxxxxxxxx
-----END OpenVPN Static key V1-----
</tls-auth>


ns-cert-type server
comp-lzo
verb 1

When not using the above but using something like:

tls-auth ta.key 1  # which works for tunnelblick

The server log shows something like:

Thu Apr 18 20:55:26 2013 TLS Error: incoming packet authentication failed from [AF_INET] IP_ADDRESS:60454
Thu Apr 18 20:55:57 2013 Authenticate/Decrypt packet error: packet HMAC authentication failed
20 Comments

funf smart phone data collecting

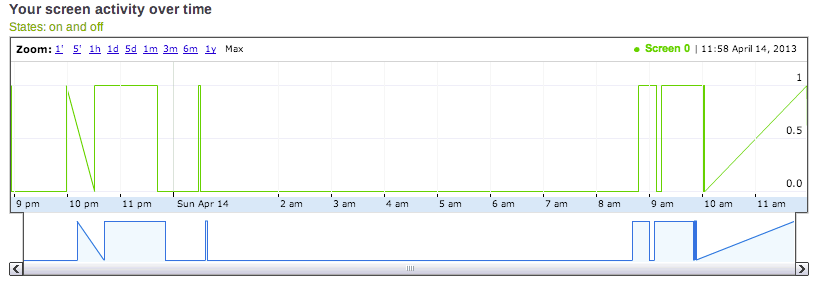
读完几本大数据的书,偶然发现了一个叫funf的手机应用,号称能将安卓手机变身为数据收集器。于是我很兴奋的下载安装,让这个app在我手机上采集了两天的数据,分析得到的结果如下:

battery_life phone_temperature relative_activity screen_activity


老实说,收集了两天的数据,就能分析出这么点东西,着实让人失望。不过这个生成图像信息的程序是开源的,而且是用Python实现的,今后有空了也可以自己来分析一下收集到的数据。funf在我的手机上也经常不能响应,可以说这个app是十足的半成品。不过这个由来自MIT的团队开发的不仅仅是一个手机app,号称是一个Open Sensing Framework,前几天还刚刚被Google收购了。虽然是个半成品,但Google这个时候收购团队总比让他们羽翼丰满之后再收购所花的代价要小得多。

Leave a Comment

Block unauthorized ssh login attempts (attacks)

My friends and I am working on a hobby project and  we need a Git server, so I set up one on my MacBook Pro. We access the repository via SSH. However when I checked the ssh log I found someone trying to get ssh access to my machine by guessing usernames. The log looks as follows:

Jun 29 21:06:52 doh1 sshd[19400]: Invalid user postgres from 190.181.132.70
Jun 29 21:06:52 doh1 sshd[19401]: input_userauth_request: invalid user postgres
Jun 29 21:06:52 doh1 sshd[19401]: Received disconnect from 190.181.132.70: 11: Bye Bye
Jun 29 21:06:54 doh1 sshd[19402]: reverse mapping checking getaddrinfo for wimax132-70.yota.com.ni [190.181.132.70] failed - POSSIBLE BREAK-IN ATTEMPT!
Jun 29 21:06:54 doh1 sshd[19403]: Received disconnect from 190.181.132.70: 11: Bye Bye
Jun 29 21:06:55 doh1 sshd[19405]: reverse mapping checking getaddrinfo for wimax132-70.yota.com.ni [190.181.132.70] failed - POSSIBLE BREAK-IN ATTEMPT!
Jun 29 21:06:55 doh1 sshd[19405]: Invalid user backup from 190.181.132.70
Jun 29 21:06:55 doh1 sshd[19406]: input_userauth_request: invalid user backup
Jun 29 21:06:56 doh1 sshd[19406]: Received disconnect from 190.181.132.70: 11: Bye Bye
Jun 29 21:06:57 doh1 sshd[19407]: reverse mapping checking getaddrinfo for wimax132-70.yota.com.ni [190.181.132.70] failed - POSSIBLE BREAK-IN ATTEMPT!

I first tried to use DenyHosts, however, there are still attempts from other IP addresses. Since there are three of us accessing the repository, I configured the hosts.allow and hosts.deny manually: deny all hosts other than the IP addresses I trust.

hosts.deny:

~$ cat /etc/hosts.deny 
sshd: ALL

hosts.allow:

~$ cat /etc/hosts.allow
sshd: [The IP addresses you allow to connect via SSH]
ALL: localhost

Now the log file should be quite…

Leave a Comment

Migrating JComments to WordPress

I switched back to WordPress from Joomla! after I registered this new domain. After migrated all the posts to WordPress using FG Joomla to WordPress, I noticed the comments have not been transferred. After some digging I didn’t find satisfactory plugin to do that, so I wrote my own PHP script to fulfill this task. The code is also available from GitHub.


13 Comments